Developed by OARC at UCLA in collaboration with SDSC and TACC
Documentation Home · End Users · App Contributors · Tutorials · Systems · Tenant Admin · Reference
End User Guide
This guide covers the tasks most users perform on OneSciencePlace (OSP): finding and launching applications, monitoring the resulting jobs, working with data, and creating publications from research artifacts. If you are using OSP to do research, take a course, or access tools your institution has made available, start here.
On this page
- Signing in
- Browsing the App Store
- Launching an app
- Monitoring jobs
- Cloning and re-submitting jobs
- Working with data
- Creating and managing publications
Signing in
OSP deployments typically use federated authentication, letting you sign in with your home institution's credentials through CILogon, Globus Auth, or another identity provider. Your tenant administrator configures which providers are available.
Once you sign in for the first time, OSP creates your web account automatically. You don't need to create a separate password — your institutional credentials are used every time you sign in.
If your OSP deployment connects to HPC systems where you have existing accounts, you may need to complete an additional step to link your OSP web account to your per-system account. Your tenant administrator will either have automated this linking or will provide instructions for adding OSP's SSH public key to your account on each target system.
Browsing the App Store
The App Store is the landing point for discovering applications available on your OSP deployment. Click Apps in the main navigation to open it.
Each app card shows the app name, a short description, the target system, the app type, the runtime, and a status label indicating the app's maturity. Cards expose two actions: View opens the app's detail page, and Launch begins job submission directly.
App types
- Batch — a non-interactive command-line application that runs, produces output files, and ends.
- Web — an interactive web application (such as Jupyter Notebook) that you open in your browser after the job starts.
- VNC — an interactive graphical application (such as MATLAB) delivered through a VNC session.
Status labels
Apps may be labeled Alpha, Beta, Stable, or Dev, indicating the app author's assessment of maturity. Stable apps are tested and production-ready; earlier stages carry more risk of changes or issues.
Multiple instances of the same tool
An app is mapped to a single system. The same underlying tool deployed on multiple systems appears as multiple cards — one per deployment. For example, Jupyter Notebook on a local host and Jupyter Notebook on an HPC cluster are two separate cards. Check the system indicator on each card to choose the right one for your needs.
View vs. Launch
New users are encouraged to click View before launching. The app detail page describes what the app does, what inputs it expects, typical runtime, and any citation or usage guidance provided by the app's author. Once you are familiar with an app, clicking Launch directly from the card is faster.
Launching an app
Clicking Launch on an app card, or Launch app from the app detail page, opens the app's launch form. The launch form captures the information the app needs to run.
Job resources
Most launch forms let you specify or override resource requirements:
- Number of nodes — how many compute nodes the job will use.
- Cores per node — CPU cores allocated per node.
- Memory (MB) — memory allocation for the job.
- Max runtime (minutes) — the maximum time allowed before the job is terminated by the scheduler.
Default values are provided by the app. Users can typically override them where the app's author has allowed overrides. If an override field is not shown, the app's author has fixed that resource.
Job details
- System — the compute system the app runs on, usually preselected based on the app's configuration.
- Job name — a name you choose for this job, used for later identification in the My Jobs list.
- Allocation — if the system requires an allocation (typical on shared HPC systems), select or enter it here.
App-specific parameters
Below the standard fields, the launch form shows input fields defined by the app's author. These vary by application — a classifier might ask for an image URL, a simulation might ask for numeric parameters, a notebook might ask for a password token. Each field comes from the app's launch form configuration.
Input files
If the app accepts files, you can either upload them from your computer or select existing files from your OSP storage.
Submitting or saving
After filling out the form, click Submit to start the job immediately. Click Save Draft instead to save your configuration without submitting, so you can return and submit later.
Monitoring jobs
Once a job is submitted, you are taken to the job status page. This page shows the job's progress through its lifecycle in real time.
Job statuses
- Staging job — the job is being prepared for execution; input files are being moved to the target system.
- Processing inputs — inputs provided in the submission form are being processed.
- Queued — the job is waiting for resources or scheduler availability on the target system.
- Running — the job is actively executing.
- Finished — the job has completed successfully. Output files are available.
- Failed — the job ended with an error. Error details are typically shown on the status page.
The status page also shows the resources allocated to the job — number of nodes, cores, memory, system name, and other details.
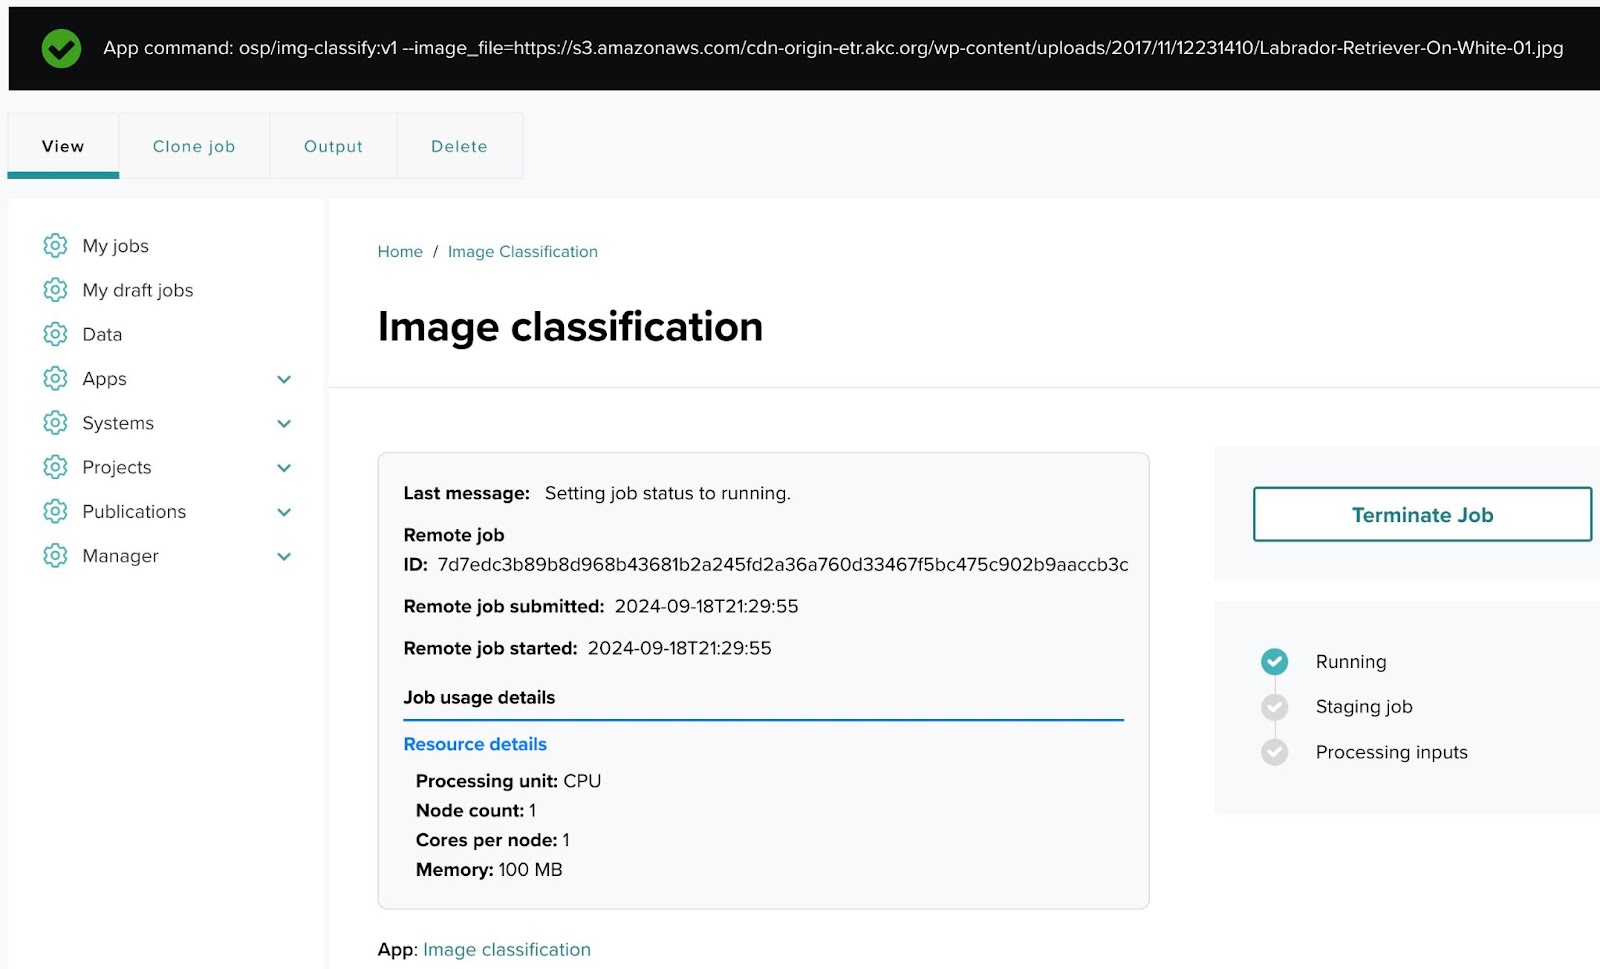
Terminating a running job
If needed, you can terminate a running or queued job from the status page by clicking Terminate Job.
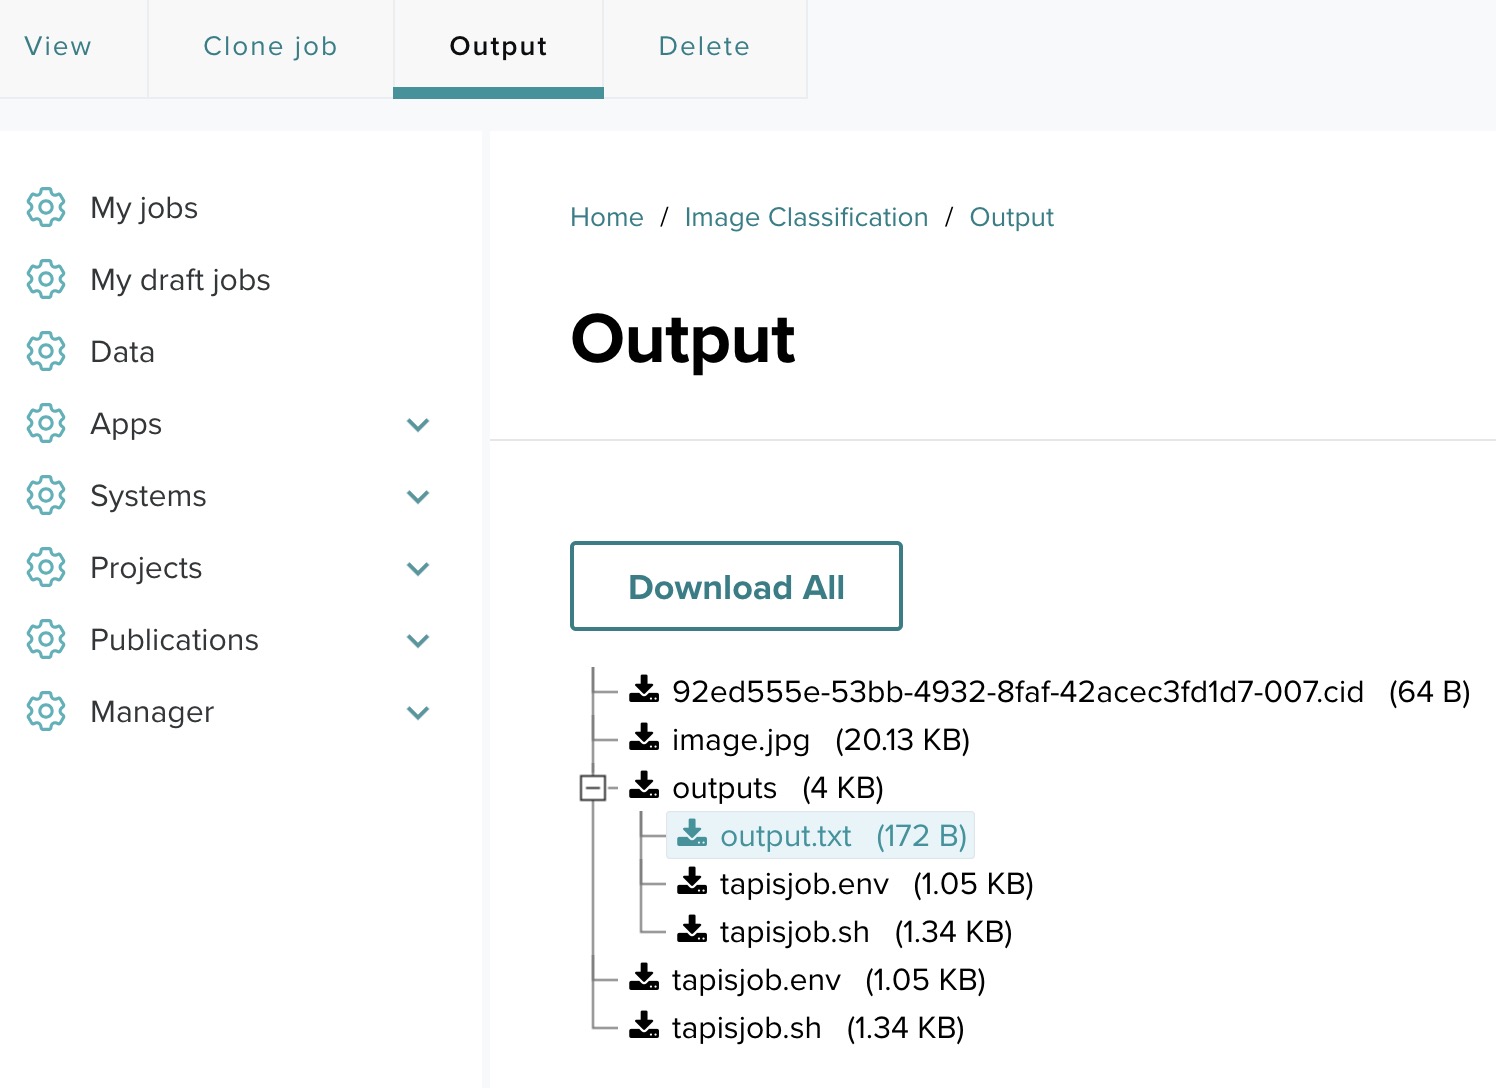
Reviewing job output
After a job completes, click the Output link on the status page to browse the job's output files. From there you can view, download, or share individual output files.
Opening an interactive session
For interactive apps (Web or VNC type), once the job reaches the Running state, the status page shows an Open app session button. Click this to open the running application — a Jupyter notebook, a MATLAB session, or other interactive interface — in your browser.
Cloning and re-submitting jobs
From the My Jobs menu you can view a list of all jobs you have submitted. The list shows job name, application, system, submission date, and status.
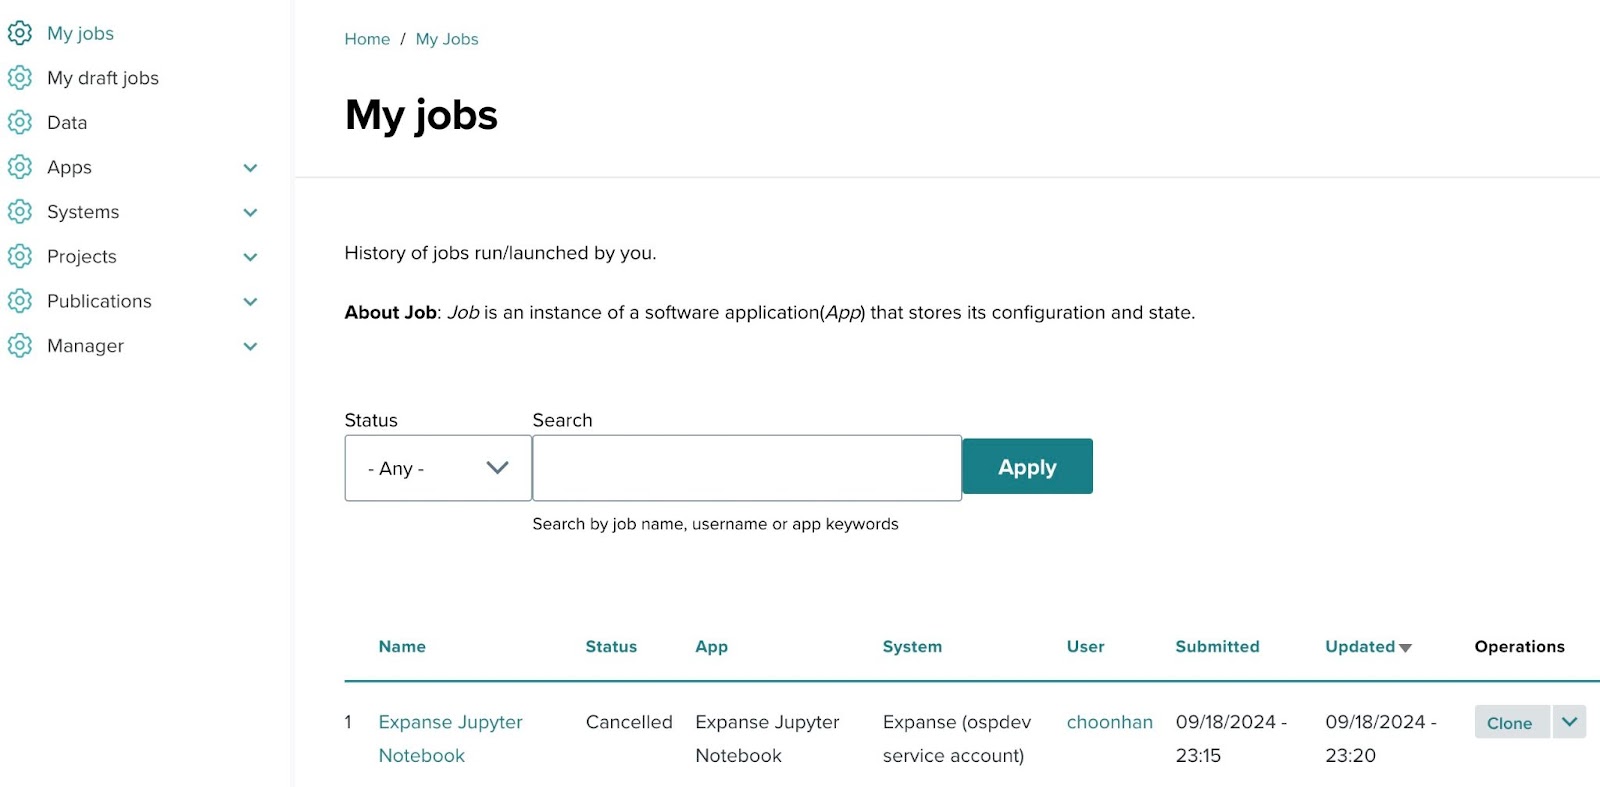
Clicking Clone next to a job opens the submission form pre-filled with that job's parameters. You can modify any field before submitting, or save as a new draft.
Cloning is the preferred way to:
- Re-run a job with adjusted inputs (for example, a different image URL or numeric parameter).
- Create parameter sweeps — a series of jobs with systematic variations.
- Reuse a proven configuration for a new run without re-entering every field.
After modification, click Submit to run the cloned job or Save Draft to save for later.
Working with data
OSP supports file and folder storage backed by POSIX filesystems and S3-compatible object storage. Your deployment's storage model is configured by the administrator; from your perspective, you work with files and folders through the OSP web interface in a consistent way regardless of the underlying storage.
Files and folders
Files and folders can carry metadata, comments, and fine-grained sharing controls. You can:
- Upload files from your computer.
- Create folders to organize your work.
- Add metadata or comments to any file or folder.
- Share individual items or entire folders with other users, groups, or publicly.
Viewing non-standard files
For file types that benefit from specialized rendering — tabular data, geospatial data, genomic data, simulation outputs — your deployment may have custom viewers configured. These open directly in the browser alongside the file, without requiring download.
Sharing
Sharing a file or folder is done through the item's sharing controls:
- Share with individuals — specify one or more users by username or email.
- Share with groups — share with a named group defined on the tenant.
- Share publicly — make accessible without sign-in, with configurable access levels (view, download, comment).
Creating and managing publications
Publications are citable records for datasets, articles, software, notebooks, or workflows. To create publications, your account needs the Publication creator role, which your tenant administrator assigns.
Publication lifecycle
Publications move through three states:
- Draft — newly created or being edited. You can freely edit the content and metadata.
- Review — submitted to an editor for review. Editors can request changes or approve for publication.
- Published — publicly available and citable. Published publications cannot be edited or deleted; new versions must be created instead.
All users, including anonymous visitors, can view the list of published publications and see their authors (with ORCID if provided), description, DOI, type, published date, related info, title, and version.
What Publication creators can do
- Create new publications.
- Edit and delete their own publications (until published).
- Clone a publication.
- Add keywords (but not edit or delete existing keywords).
- Change the publication state from Draft (default) to Review.
Creating a new publication
New publications are created with Draft status by default. When the content is ready for editorial review, change the status to Review.
- Click Publications in the upper navigation menu.
- Click Add publication.
- Fill in the required fields (marked with an asterisk): Title, Type, Version, Description, and at least one author.
- Click Save at the bottom.
Viewing your publications
From the left menu, go to Publications → My publications. The list includes both published and unpublished entries you own.
Editing a publication
Every saved edit creates a new revision.
- Go to Publications → My publications.
- Select the publication you wish to edit.
- Click the Edit tab at the top.
- Make changes and click Save.
Note: once a publication has been published, it can no longer be edited. Create a new version instead.
Deleting a publication
- Go to Publications → My publications.
- Select the publication you wish to delete.
- Click the Delete tab at the top.
Note: once a publication has been published, it can no longer be deleted.
Submitting a publication for review
- Edit the publication.
- At the bottom, change the status from Draft to Review.
- Click Save.
The publication is now visible to editors, who will review it and either request changes or approve it for publication. Once approved and moved to Published state, the publication becomes citable and receives its persistent identifier (DOI, Handle, or ARK) if one is configured.
For the editorial side of the publication workflow, see the Tenant Administrator Guide.
Previous: ← Documentation Home | Next: App Contributor Guide →